The most used command in easy code generator templates is the so called <<columnsubstitution>> command.
The input section of this command will be repeated for each of the columns within a table. You can use it for instance to create a SELECT statement and enumerate all columns.
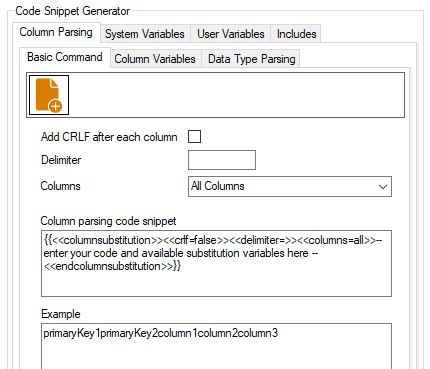
You can add this command in the code snippet generator under <Columns Parsing> -> <Basic Command>
Syntax
{{<<columnsubstitution>><<crlf=false>><<delimiter=>><<columns=all>>– enter your code and available substitution variables here —
<<delimiter>><<endcolumnsubstitution>>}}
The command has three parameters and an input area where you can add text, code or other easy code generator code snippets:
- CRLF (true or false): When true it adds a CRLF after processing one column.
- delimiter: any text that will replace the <<delimiter>> tag within the input area. Usually used as columns separator like commas or semicolons etc. the <<delimiter>> tag can be placed anywhere within the input area and also can be used multiple times.
- columns (all, selected, pkonly, removepk, orderby): predefined value that tells easy code generator which columns should be processed.
- input area (– enter your code and available substitution variables here –): here you can enter any text, code and/or add other easy code generator commands. This section will be repeated for each column. Usually you will enter the column name variable here.
Examples
For our examples below we will create a SQL SELECT statement and we will use a table (tblTemplateGroups) that has 4 columns (see image below).

Input area
In this area you can add any text, code and other easy code generator commands. In the following example we will only add a simple text “test”: {{<<columnsubstitution>><<crlf=false>><<delimiter=>><<columns=all>>test<<endcolumnsubstitution>>}}
Because we process 4 columns the result ist 4 times “test” = testtesttesttest
Instead of only text we can add a column variable, for instance the column name <<columnName>>: {{<<columnsubstitution>><<crlf=false>><<delimiter=>><<columns=all>><<columnName>>
<<delimiter>><<endcolumnsubstitution>>}}
As expected we now get: templateGroupIDdescriptionrecordInsertDaterecordUpdateDate
CRLF and Delimiter
The above examples don’t really make sense but they show the basic functionality of the column substitution command.
When we set crlf=true, a carriage return and line feed will be added after each processed column: {{<<columnsubstitution>><<crlf=true>><<delimiter=>><<columns=all>><<columnName>>
<<delimiter>><<endcolumnsubstitution>>}}
Now we get:
templateGroupID
description
recordInsertDate
recordUpdateDate
And if we additionally add a comma as delimiter: {{<<columnsubstitution>><<crlf=true>><<delimiter=,>><<columns=all>><<columnName>>
<<delimiter>><<endcolumnsubstitution>>}}
We get:
templateGroupID,
description,
recordInsertDate,
recordUpdateDate
Note that when you use a delimiter, you will need to add the <<delimiter>> tag at the position you want to use it. In our example we placed it right after the column name. You can place this tag within the input area where ever you want and how often you want.
Now we already can create the first part of a SELECT statement. In front of the <<columnsubstitution>> command we place the text “SELECT ” and after the <<columnsubstitution>> command we add the text ” FROM…”. As delimiter we use the comma with a space:
SELECT {{<<columnsubstitution>><<crlf=false>><<delimiter=, >><<columns=all>><<columnName>><<endcolumnsubstitution>>}} FROM…
Now we get: SELECT templateGroupID, description, recordInsertDate, recordUpdateDate FROM…
Columns
The <<columns=>> parameter lets you control which columns within the table should be processed:
- all: processes all columns from the table
- selected: processes all columns that are selected in the <Use> column. See image <table and column selection>
- pkonly: processes all the primary key columns, see image <table and column selection>, column <P-Key>
- removepk: processes all columns except the primary columns
- orderby: processes all columns that are selected in the <Order By> column. See image <table and column selection>
Now we are able to create a complete SELECT statement. As table name we won’t use a static text but instead we will use a system variable <<tableViewName>>
SELECT {{<<columnsubstitution>><<crlf=false>><<delimiter=, >><<columns=selected>><<columnName>><<delimiter>><<endcolumnsubstitution>>}} FROM {{<<systemvar>><<name=tableViewName>><<endsystemvar>>}} ORDER BY {{<<columnsubstitution>><<crlf=false>><<delimiter=, >><<columns=orderby>><<columnName>><<delimiter>><<endcolumnsubstitution>>}}
SELECT templateGroupID, description FROM tblTemplateGroups ORDER BY description
As you see, we use two <<columnsubstitution>> commands. One for the SELECT part and the other for the ORDER BY clause. In the first command we use <<columns=selected>> and in the second one we used
<<columns=orderby>>
In the other support pages you will see that we will reuse the <<columnsubstitution>> command for not only creating SQL commands but also to write code like declaring variables in classes based on columns in a table or to assign values to variables after reading data from the database.